Google Maps Trip Planning: Organize Your Dream Vacation Like A Pro

Turn Google Maps into your personal travel assistant. Organize destinations by day, share plans with travel companions, and never miss a must-see spot.

- Google’s My Maps allows you to create custom maps with color-coded destinations organized into layers.
- You can create up to 10 layers per map, and add up to 2,000 separate location pins across your entire map.
- My Maps integrates with other Google products like Drive, Calendar, and Photos, making it easy to build a comprehensive travel plan with reminders and notes.
- Access destination reviews, opening hours, and booking information directly from your custom map.
- Custom maps can be shared or embedded on websites for collaborative trip planning.
- You can view your custom maps on mobile devices, but you'll need to use a browser to create or edit them on the go.
Travel planning a dream trip is fun — but it can also bring a lot of anxiety. To give yourself peace of mind you can follow travel guides, copy other people’s plans, or (my favorite) you can use Google Maps trip planner to design your own ideal vacation. You can use Google’s app or web interface to:
- Add destination points
- Color code locations that you pin
- Get directions to multiple destinations
- Plan the perfect trip
I’m going to give you a step-by-step guide and instructions on how I used Google My Maps to plan an itinerary for a 3-day trip to Florence. But first, let’s look at why Google Maps is such a great trip planning tool, and what you need to know about creating maps on mobile.
💡 Pro tip: Planning a complex multi-stop route? Google Maps allows 2,000 pins per map, but if you're regularly planning routes with 10+ stops for business purposes, you might need dedicated route optimization software like Routific.
What you can and can’t do on mobile
The Google Maps app is great for so many things, but creating maps? That’s not one of them. Before you get into the thick of things, you need to know what you can and can’t do on your phone.
Here’s a rundown of mobile capabilities:
Can do on mobile:
- View the maps you created
- Read notes
- See photos on pins
- Navigate to your saved locations
- Toggle layers on and off
Can’t do on mobile:
- Edit or create new maps
- Add or remove pins
- Change customization options
My recommendation? Plan your trip on a desktop (it’s easier anyway) and use it on mobile (when it’s most convenient).
Why Google Maps is a great trip planner
Planning a trip tends to increase happiness. Mindset and mood change when you have something to look forward to — but without an itinerary in place, this excitement can turn to anxiety.
Here are my four top reasons why you can, and should, use Google Maps to plan a road trip or vacation:
1. Integration with other Google products
Your Google account connects you to a number of different products that work really well together to make life easier during your travels. You can:
- Create a custom map and then copy it to your Google Drive.
- Plan out each day’s agenda in Google Calendar, with exact locations and map links included.
- Use Google Sheets to budget for your vacation or road trip.
- Use location names in Google Photos so your pictures are easy to find and organize.
Google’s deep product integrations make it easier to plan recreational trips and learn more about the places you plan to visit.
2. Reviews and additional location data
The Google Maps app on your phone doesn’t have all the features of the desktop version. But if you plan out your trip on the app, you can move seamlessly between the two so that you can read:
- Reviews from other visitors
- Information about your places, including website URLs and opening and closing times
- Things to do nearby
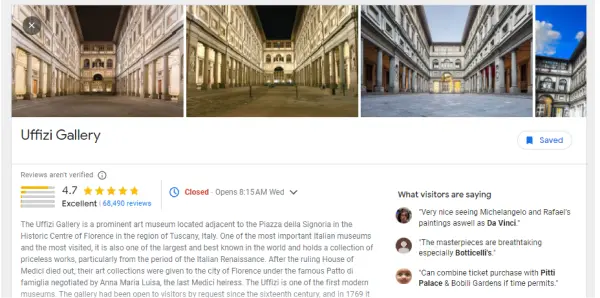
A lot of reviews include useful travel tips. For example, when I was planning my trip to Florence I read the reviews for the Uffizi Gallery, a must-visit place for me. That’s how I found out that even though you can buy tickets on the same day, the queues are long, so it’s better to buy tickets in advance.
3. Easy access to your trip itinerary
Some people keep their trip itineraries in a spreadsheet or document, but I love the combination of Google Calendar and the Google Maps trip planner. I can visualize exactly where I plan to go each day, and see instantly what’s around it. Google Maps routes are a breeze to create and make it easy for me to check travel times, no matter whether I’m walking, driving, using public transit or taking a taxi.
4. Personalized notes and labels
Worried you’ll forget something important? Just open Google Maps, go to your trip planner, and add notes to your places. For example, I’m likely to forget to preorder tickets! So I create an event in Google Calendar to remind me, link the location to the event and add all the notes I need in Maps.
Three ways to use Google My Maps for trip planning
There are many ways to use Google My Maps for planning trips, but I find it most useful for:
1. Structured itinerary planning
Some trips need a structured plan to make sure you see everything on your bucket list. Google My Maps is great for this. You can create different layers (more on that soon) to keep your destinations, activities, or days organized neatly in one simple map you can use on the go.
2. Brainstorming future trips
Half the fun of traveling is planning your trips. If you have a dream destination, you can use Google My Maps to start visualizing and planning that trip now and add to it over time.
3. Loose exploration style
Some of the most memorable trips are ones where you let life take you wherever it wants to go. Those spontaneous moments or places you find yourself in because you got lost along the way.
Even when you’re in loose exploration mode, you can still use Google My Maps to:
- Add new places to explore in real-time as you’re out and about
- Pin destinations you love to explore again in the future or share with friends
My Maps makes it so easy to plan and organize your trip. Let’s see how it works step by step.
How to use Google Maps to plan your trip
Now, here comes the fun part — planning your trip. Here’s how I do it:
1. Create a new custom map
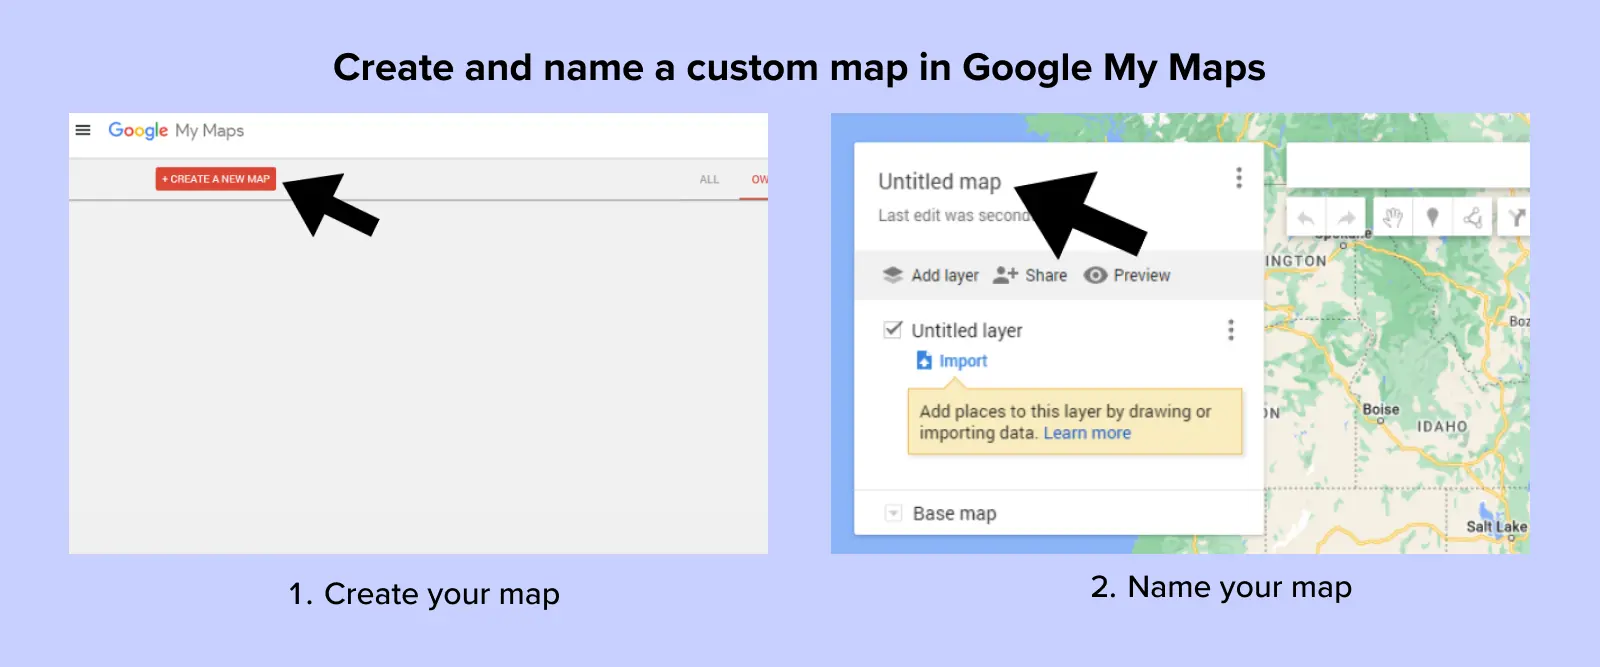
To start planning your trip with Google Maps, visit https://www.google.com/mymaps. On your My Maps dashboard, click the “Create a New Map” button.
Maps will open up, and you’ll have lots of options here. Start by giving your map a name. Click “Untitled Map,” and a dialog box will open up where you can add the map’s name and a description.
For this example, I’m planning a 3-day trip to Florence, Italy. So let’s call this map “3 Days in Florence.” That link leads straight to the live map, so you’re welcome to explore!
Once you’ve given your map a name, you can start adding your locations.
2. Add and customize your locations
Now, here comes the fun part — adding all of the places you want to visit during your trip. I’m going to assume that you already have a list of places, but if not, take this time to research the city and make a list of sightseeing spots.
Having a list will make the planning process much quicker and easier.
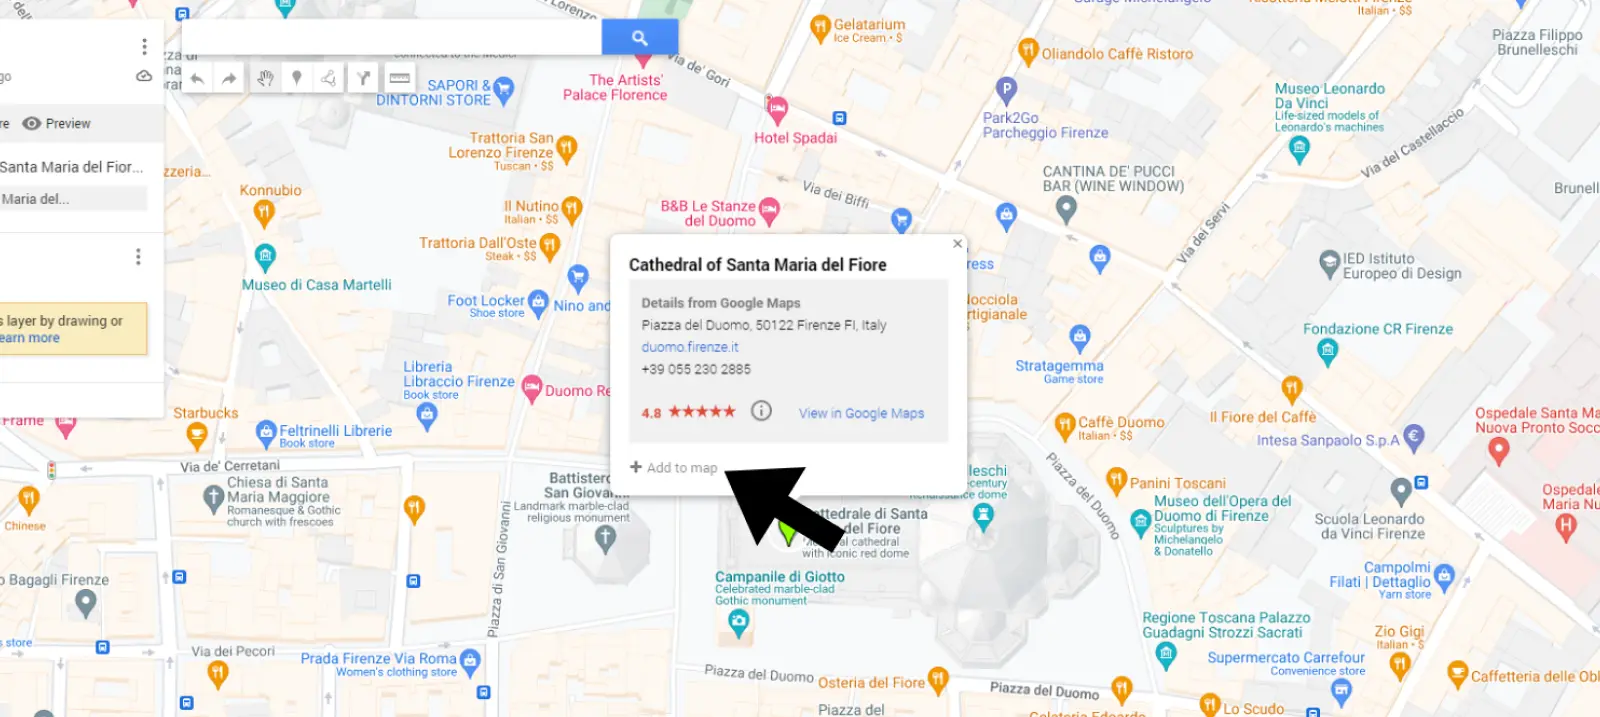
In Google Maps, your locations are “pins”. To start adding pins, use the search bar to search for the place of interest.
Let’s start with one of the most famous sights in Florence: The Cathedral of Santa Maria del Fiore, also known as the Duomo.
Maps will zoom in on the place you search, and you’ll have the option to “Add to Map.” Click or tap this button, and the point of interest will be added to your map layer.
If you want to keep your pins more organized, you can change the color and icon for each point of interest.
You’ll see a paint can icon when you hover over the location. Click it to open up your customization options. Google Maps gives you a wide range of icons to choose from, including ones for monuments, museums, gardens, and more.
These icons make it a little easier to see what each destination is at a glance. And that can help make the next step easier, too.
💡 Pro tip:Choose whatever colors and icons make sense to YOU — green for restaurants, red for must-see places, etc.
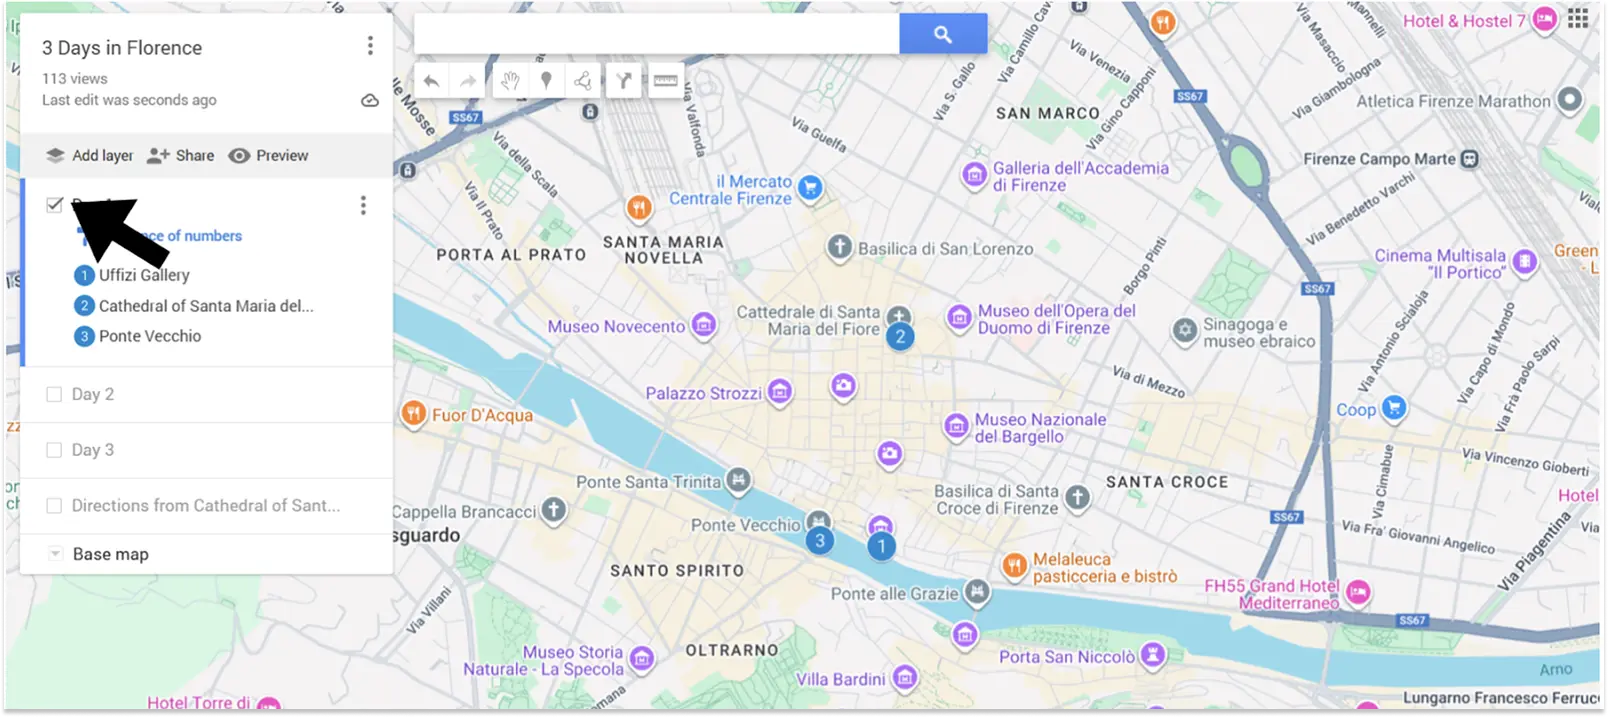
3. Break your trip down into layers (categories)
Planning a trip is fun and exciting, but it can easily become chaotic and messy if you don’t organize things. Breaking your trip down into layers (or categories) will help you keep track of everything you want to do.
In this example, I’m planning a short trip to Florence. It makes sense to break my trip down into days, so I know which points of interest I want to visit each day. In this case, each day will be a new layer or category.
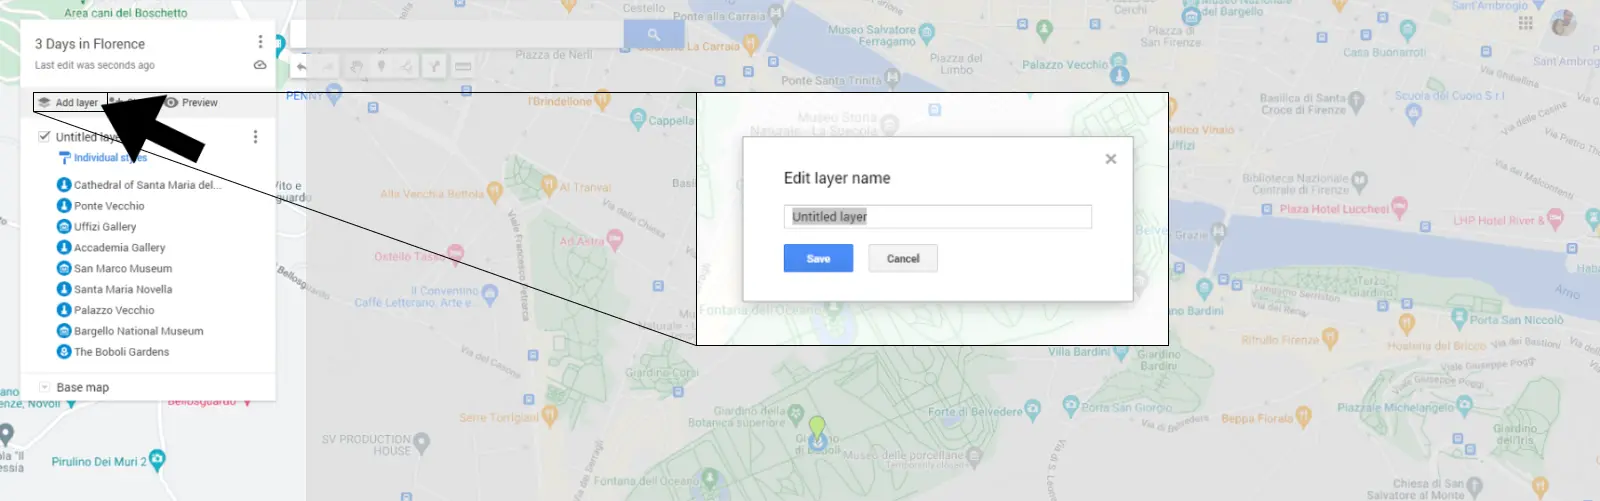
To organize things, I can click on “Add layer.” Each layer will be a new “category.”
Once you click “Add layer,” you’ll have the option to name it. Delete “untitled layer” and add your own name. In this example, I’m going to add three layers and name them “Day 1,” “Day 2,” and “Day 3.”
Once that’s set up, I can start organizing my points of interest for each day.
When planning your trip, you can add whatever categories (or layers) you want as long as they are relevant to your trip.
💡 Pro tip:Use the layer visibility toggle (checkbox) to focus on one day at a time. This prevents visual clutter when you're planning complex multi-day itineraries with dozens of stops.
Plan your trip like a pro with these organization strategies
Let’s say you’re planning a road trip itinerary.With layers, you may choose to break your trip down into cities and add points of interest within each city. Maybe you want to have categories for food or specific points of interest.
The great thing about using Google Maps is that you can customize it to your own traveling style and tastes.
I broke my Florence trip down into days, but you can organize your layers however you want:
- By activity type: Categorize your trip by where you want to eat/drink, places to stay, things to do, shopping, or whatever other activities you have in mind.
- By importance level: Have an ambitious itinerary? Break it down into layers for must-see, nice-to-have, and backup stops (just in case you have spare time).
- By cost: Traveling on a budget? Try creating layers for free activities and paid attractions to stay on budget while still having fun.
- For long-term planning: If you’re planning a lengthy trip, create layers for each destination or city. Customize the colors for each activity (food, attraction, hotel, etc.) to keep things organized.
- Hybrid approach: Combine different strategies (activity type, importance level, etc.) to create a truly custom map that matches your traveling vibe.
💡 Pro tip: Consider adding special layers for metro stations, grocery stores, or hotels in a “logistics” layer for easy reference while you’re on the go.
How many layers can you add to a map?
Layers can keep your map organized, but don’t get too overzealous with them. There is a limit to how many layers you can add: 10.
If you’re planning a big and complex trip, you may need to plan out your layers or categories carefully.
How many location pins can you add to each layer?
You can add up to 2,000 separate pins to each map you create in My Maps.
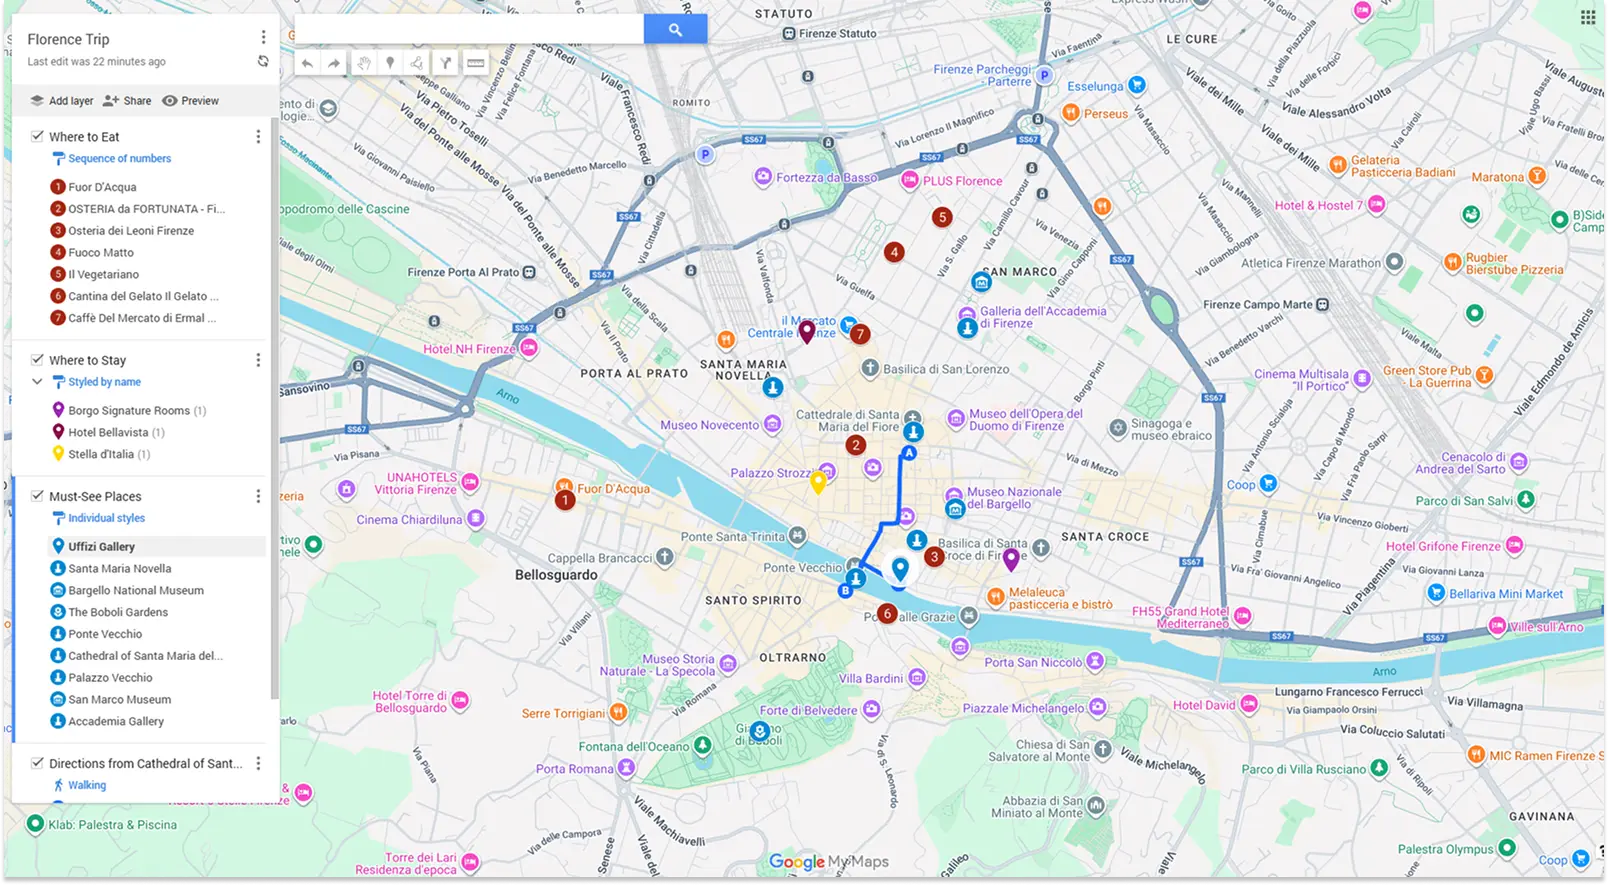
4. Plan your itinerary

With all of your categories created, it’s time to start planning your itinerary. You can easily move points of interest into different layers (or categories) to plan things out. Just click and drag the pin to wherever you want it to go.
In our example, I created three layers (one for each day), so to plan my itinerary, I dragged each point of interest into its respective layer.
But what if you’re not breaking your trip up into days? What if you’re categorizing your points of interest by city or type (museums, restaurants, etc.) No problem! You can create your layers in whatever way makes most sense to you. The point is that Google My Maps makes it easy to visualize your trip. At a glance, you can see which points of interest are close to each other. That makes it easy to create your itinerary on paper or in a digital planner.
5. Start booking
Now that you have your trip planned out, you can start:
- Booking your hotels
- Scheduling car rentals
- Reserving tickets for events or museums
Consider booking as far ahead as possible. If you wait too long, you may find that tickets and rooms are sold out.
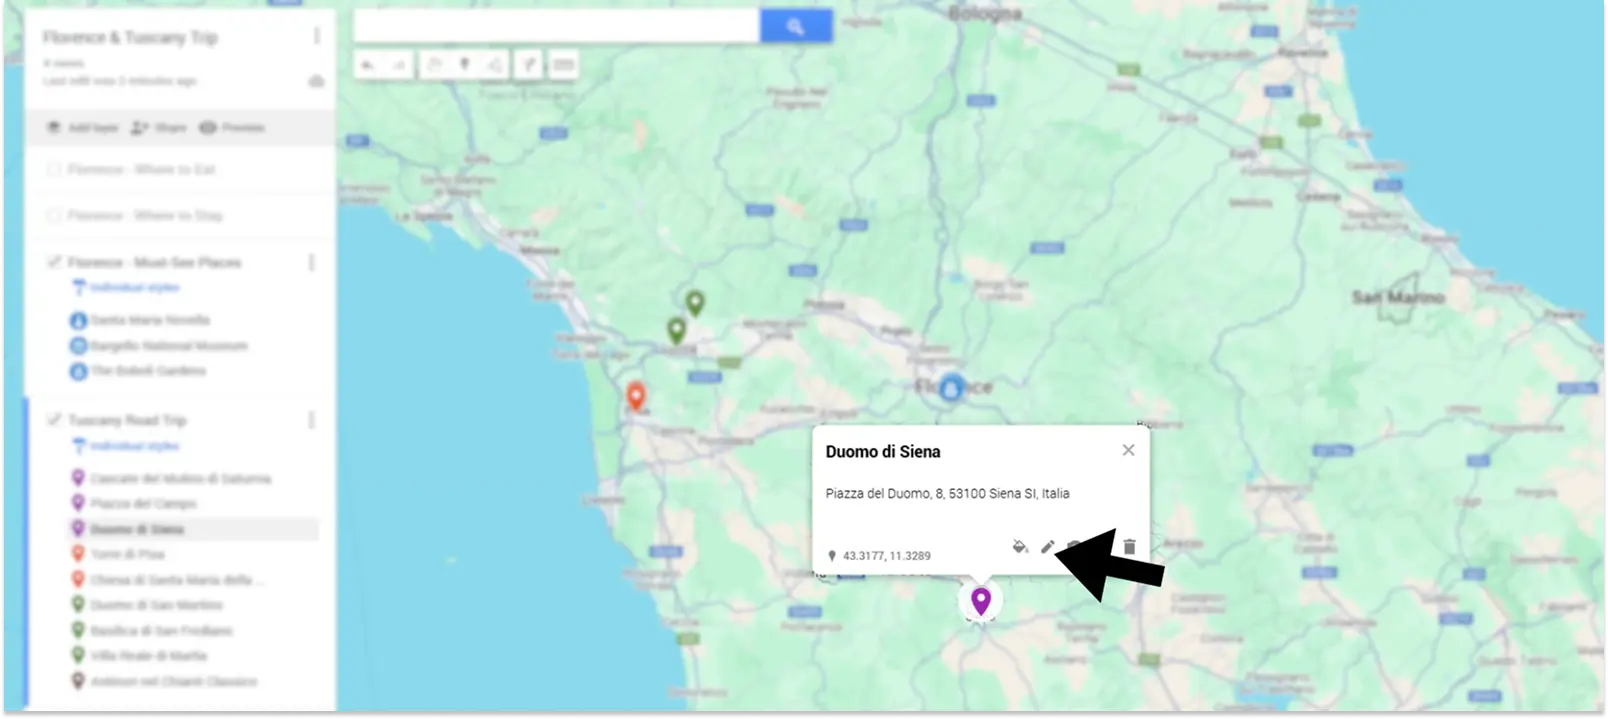
💡 Pro tip: Add booking links, phone numbers, reminders (e.g., pre-book tickets or closing times), and costs directly to pin descriptions for easy access when you travel. Just click the pencil icon on the pin, and add whatever information you want. 👇
6. Share your map
If you’re traveling with friends or family, you can share your map and itinerary with them.
Here’s how:
- Head back to the main Google My Maps dashboard
- Click the share button (the arrow icon) on the map you just created
You can share your map via Facebook, email, or Twitter. You can also embed your map on your website if you have one.
7. Access your map on your phone
You’ve created your map and shared it with your friends. But to use it on your phone, you’ll need to make sure that you have the Google Maps app installed.
Here’s how to access your maps on mobile devices:
- Open the Google Maps app
- Tap Saved
- At the bottom, tap Maps
- Choose your trip’s map from the list
💡 Pro tip: Screenshot your daily itinerary layers before you travel. If you lose internet connection, you'll still have a visual backup of your planned stops and their locations.
Google My Maps limits and workarounds
Advanced Google My Maps features
What if you’re planning a big trip? Think cross-country road trip with dozens of stops along the way. That would take forever to enter each stop manually, right?
Here’s the good news:
- Google My Maps allows you to import locations from CSV files or Google Sheets
This functionality makes it easy to bulk add locations to your plans.
Note: This feature only works with Google Sheets — not Google Docs.
Let’s give it a try.
Say I want to extend my trip to Florence and hit the road to visit different sites in Tuscany. I can import a list of locations directly from Google Sheets.
Here’s a step-by-step tutorial to show you how it works.
1. Prepare your file
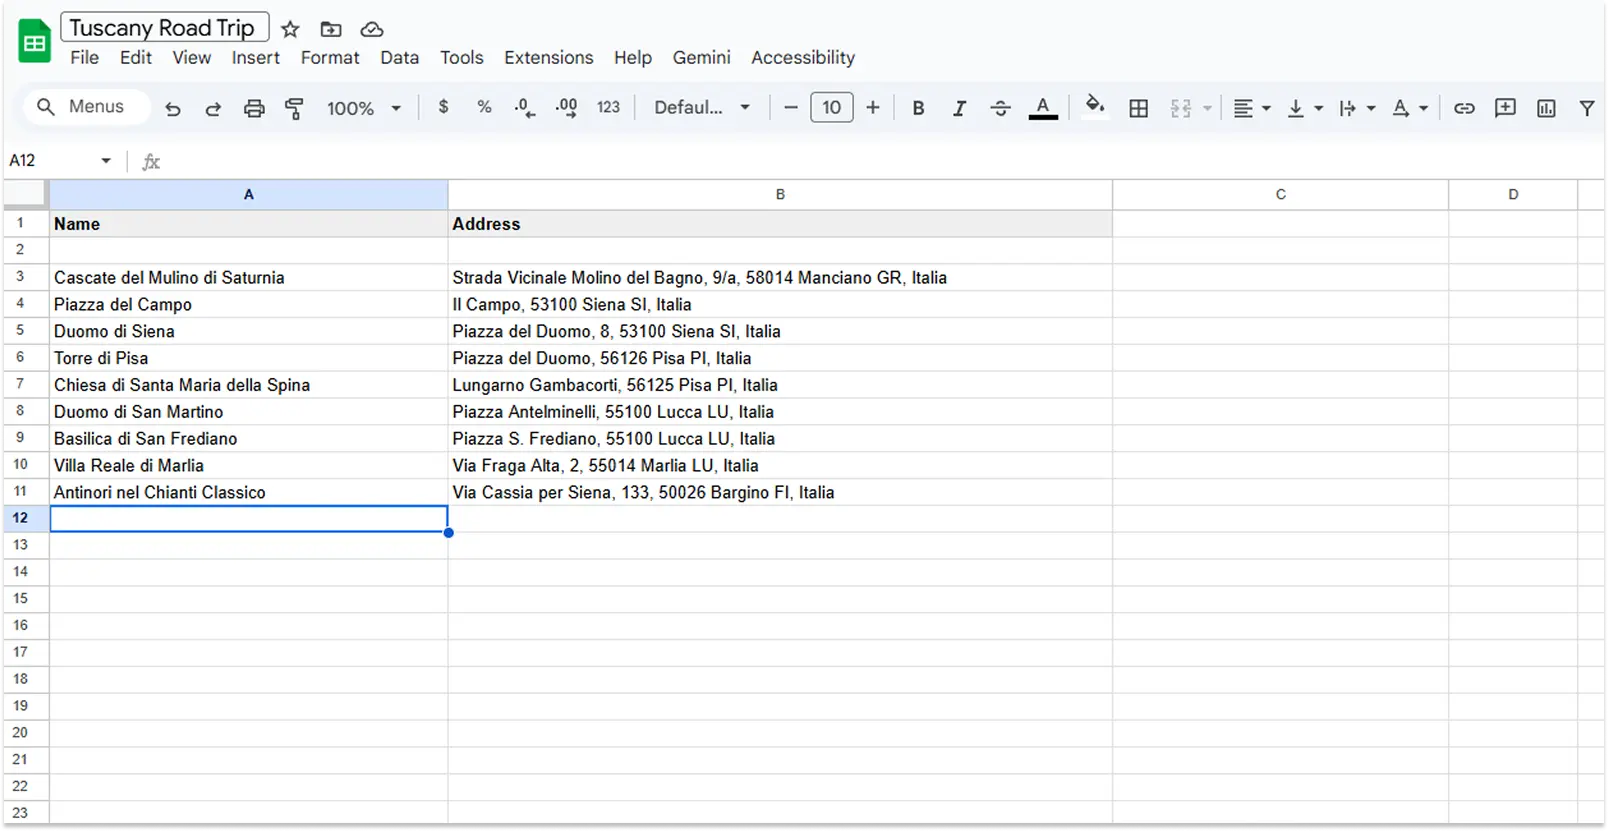
Before you do anything else, prepare your file. I’m doing this in Google Sheets, but you can create a CSV or Excel file with a list of destinations. Here, I have two columns: Name and Address. You can have as many columns as you want if you want to keep a more detailed itinerary outside of Maps.
2. Add a new layer
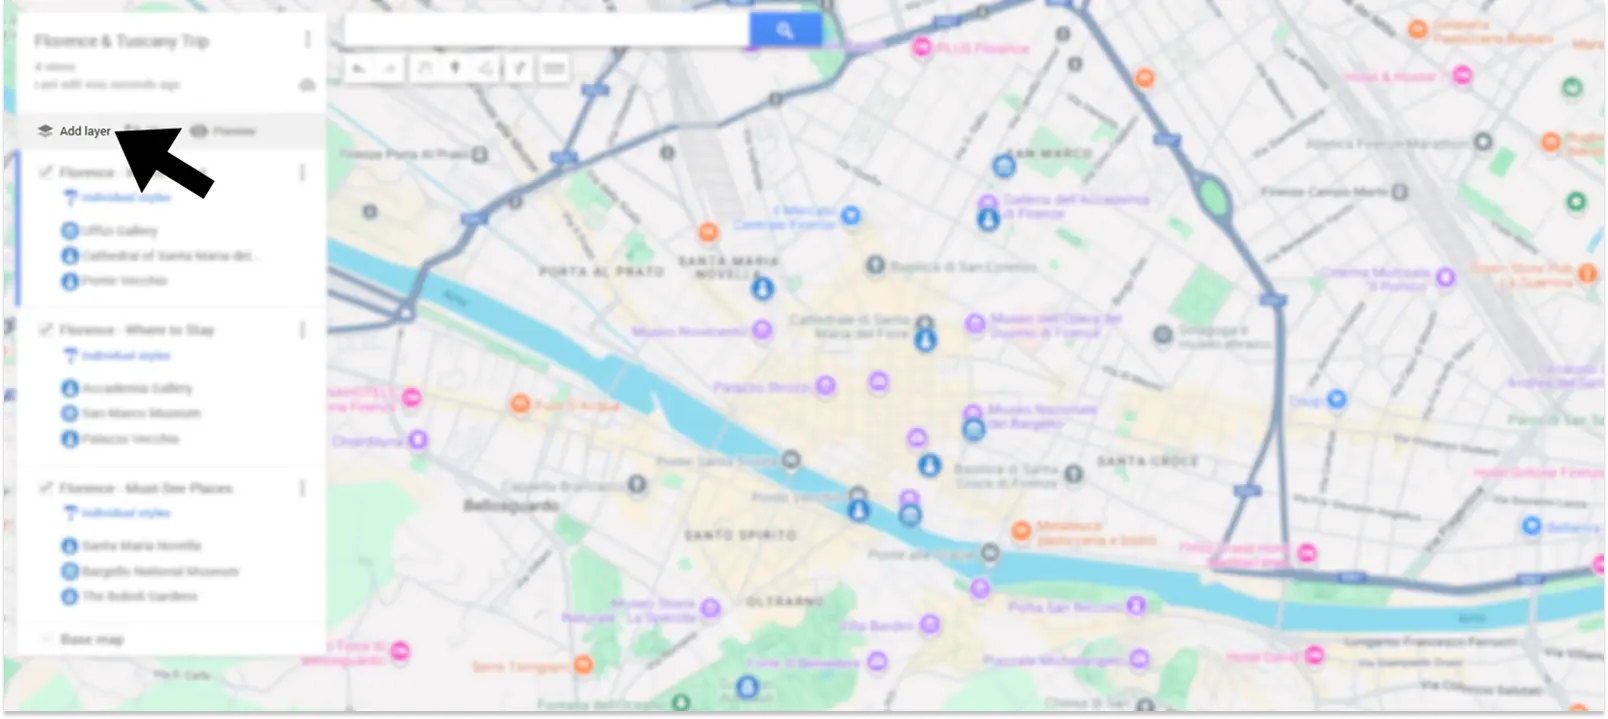
Now, let’s start the import process. Head over to your Map. Click the “Add layer” button just above your first map layer. Give your new layer a name. I’ve called mine “Tuscany Road Trip.”
3. Click “Import”
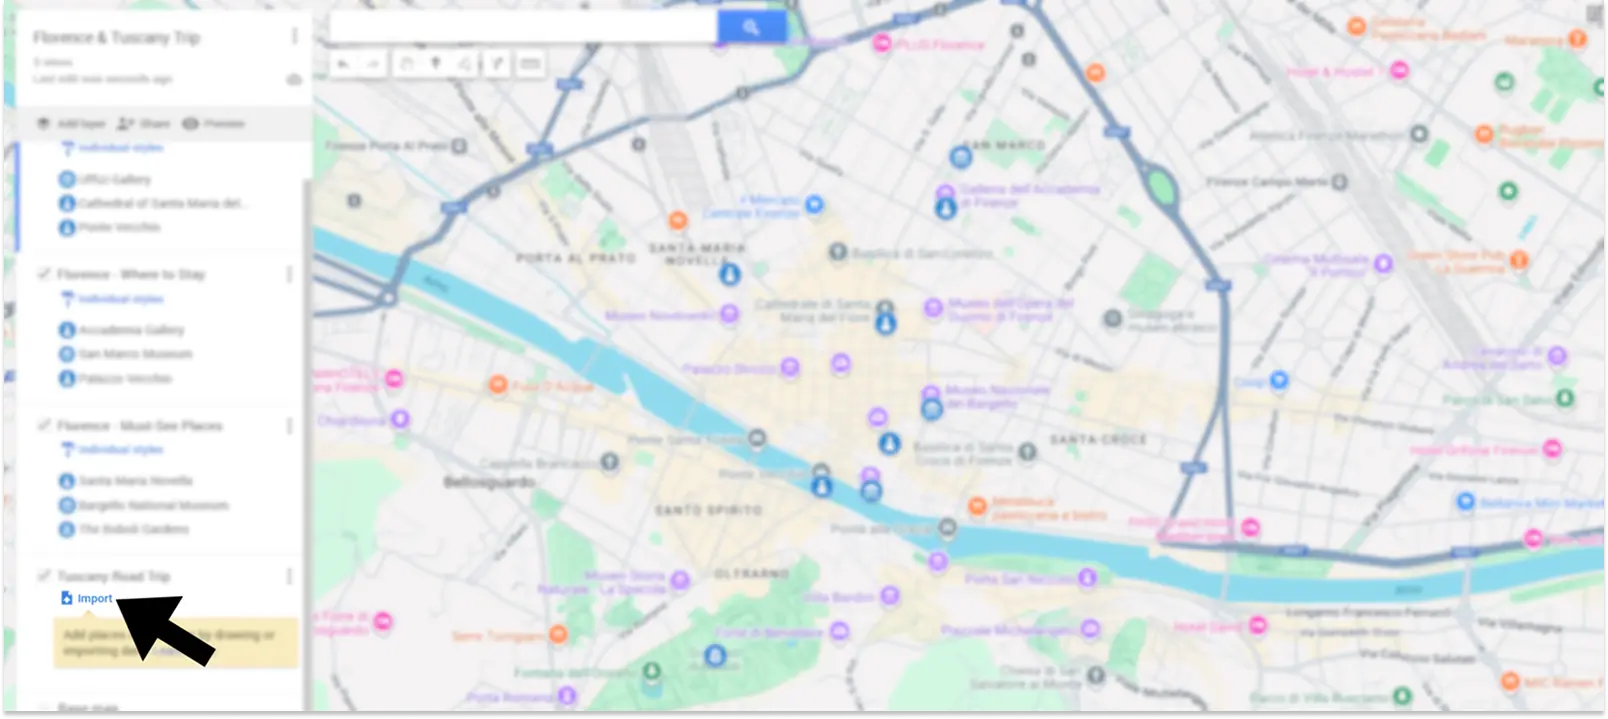
Next, scroll down to your new layer and click the “Import” button.
4. Select or upload your file
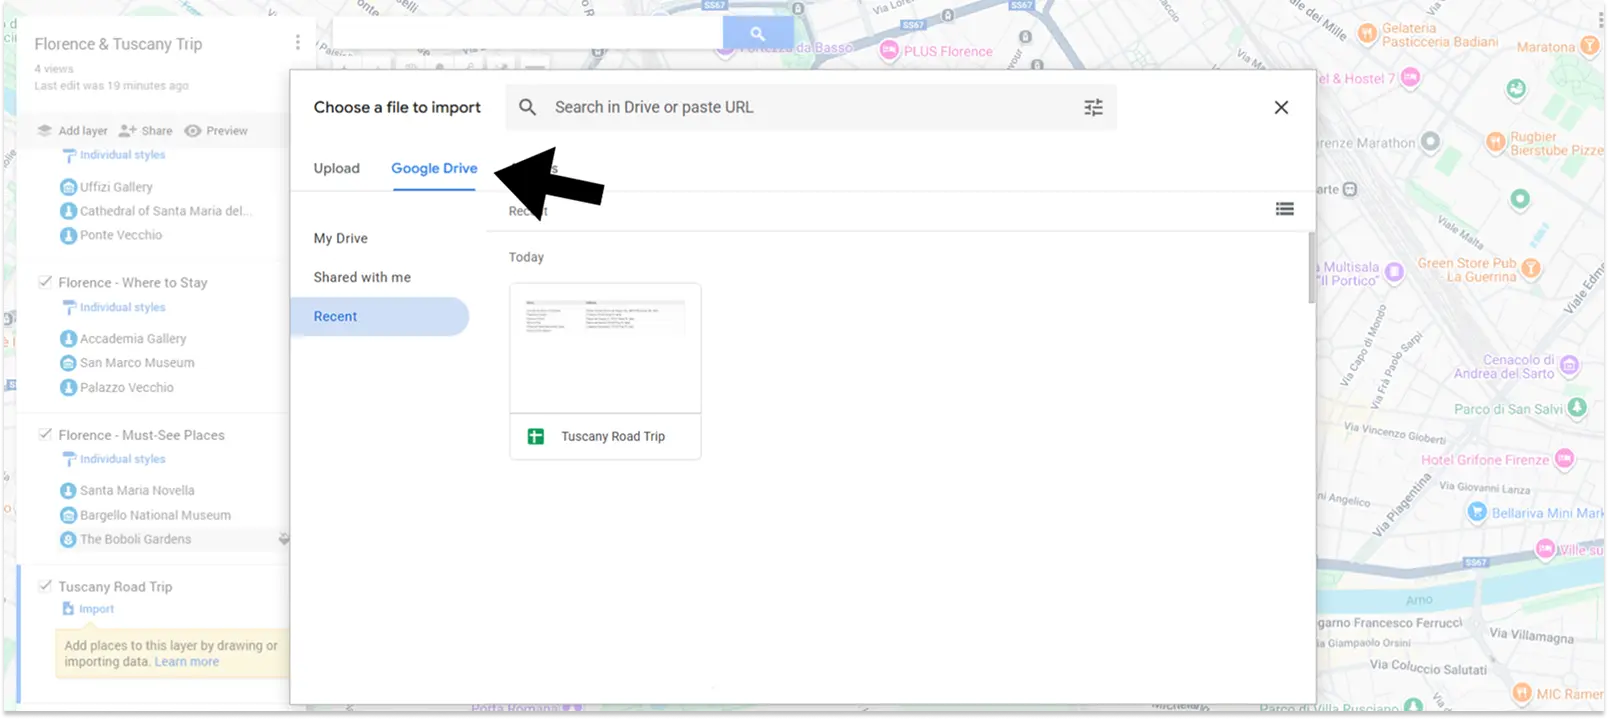
Annotated screenshot of Google Maps highlighting the upload option
You can now upload or import your file from Google Drive. I’m using the file from my Google Drive. All I have to do is click the filename.
5. Choose columns
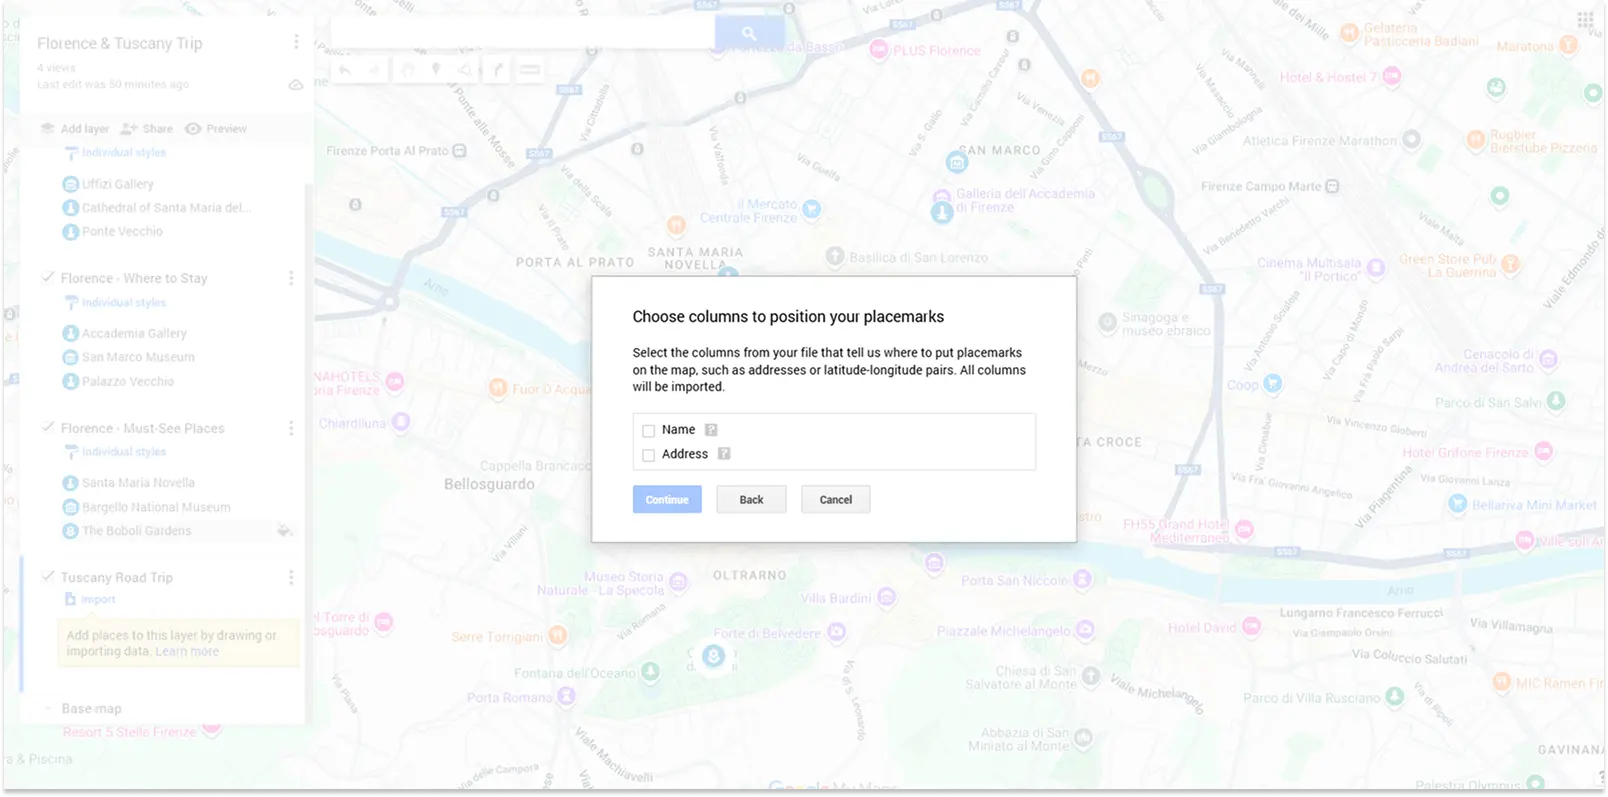
Next, you’ll be asked to select the columns that tell Google where to put placemarks on the map. I selected Name and Address for my file. If you have more columns (like Notes), there’s no need to select them.
6. Choose a column to title your markers
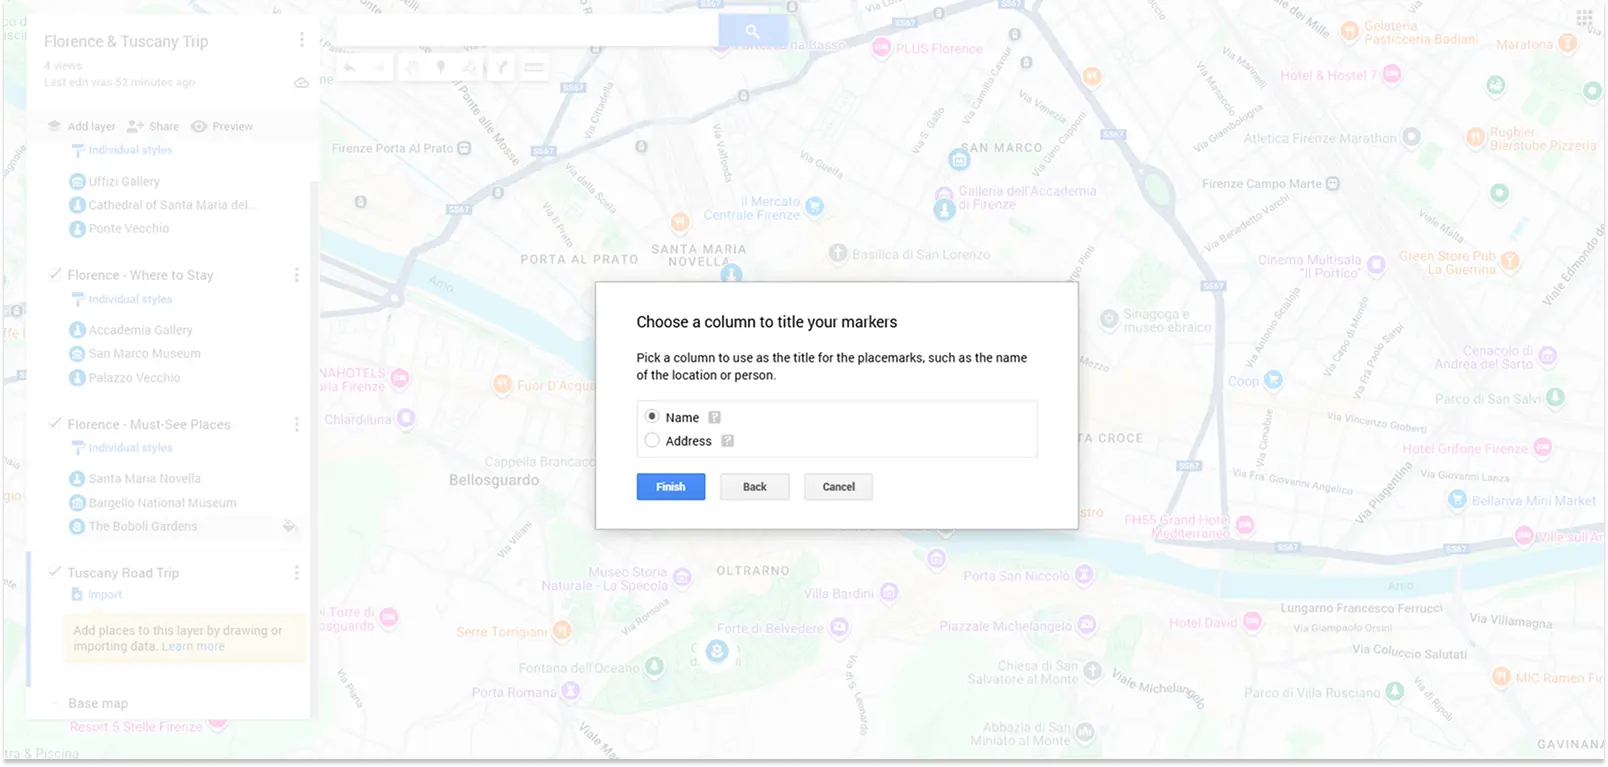
Now, choose the column that you want Google to use as the title for your pins. I chose Name, but you select whichever column has the destination’s name in your file.
7. Customize your pin style
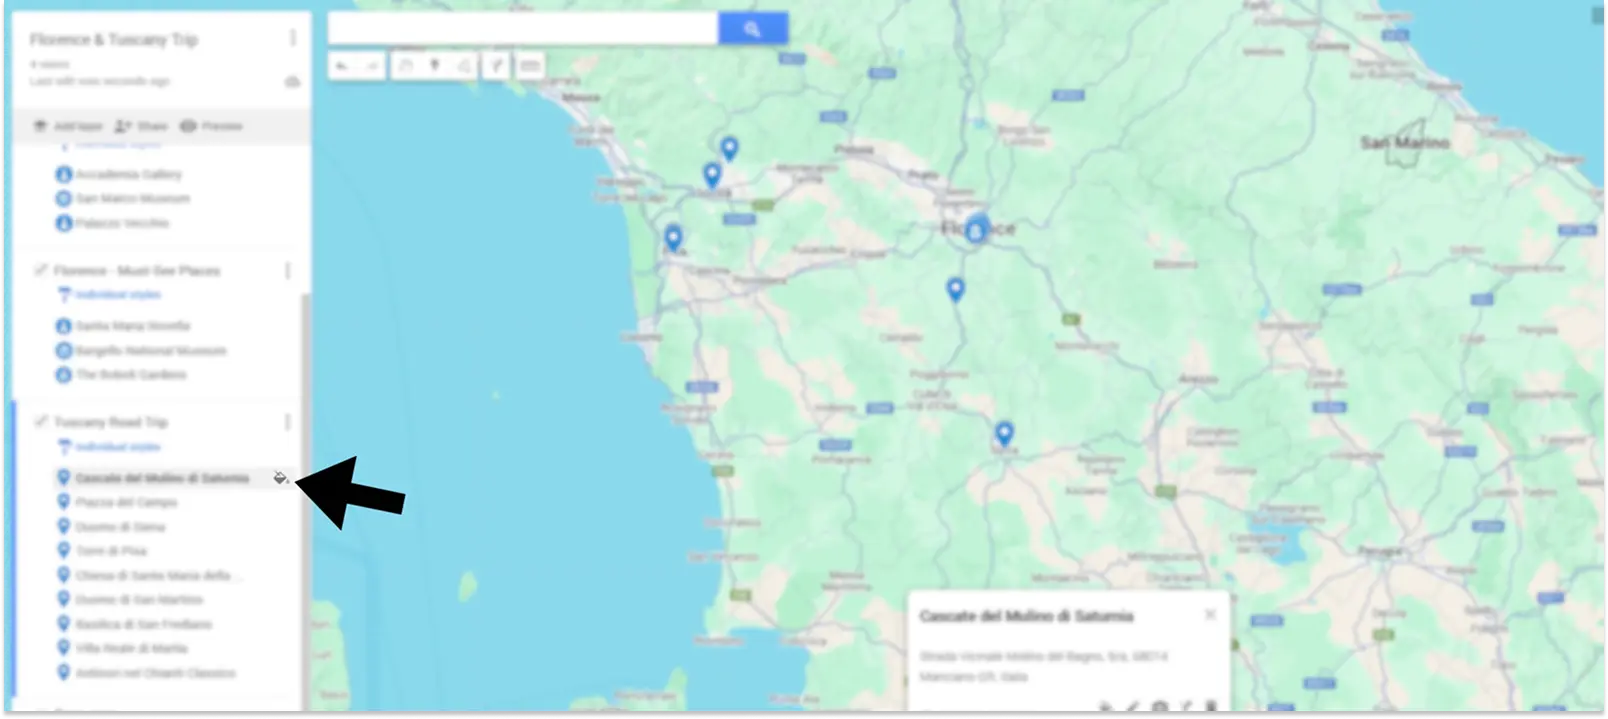
To make your trip more organized, I recommend customizing your pin style. The process is the same as when we created and customized layers earlier.
First, scroll down to your imported layer. Then, click the paint can icon next to one of your pins to bring up the customization menu.
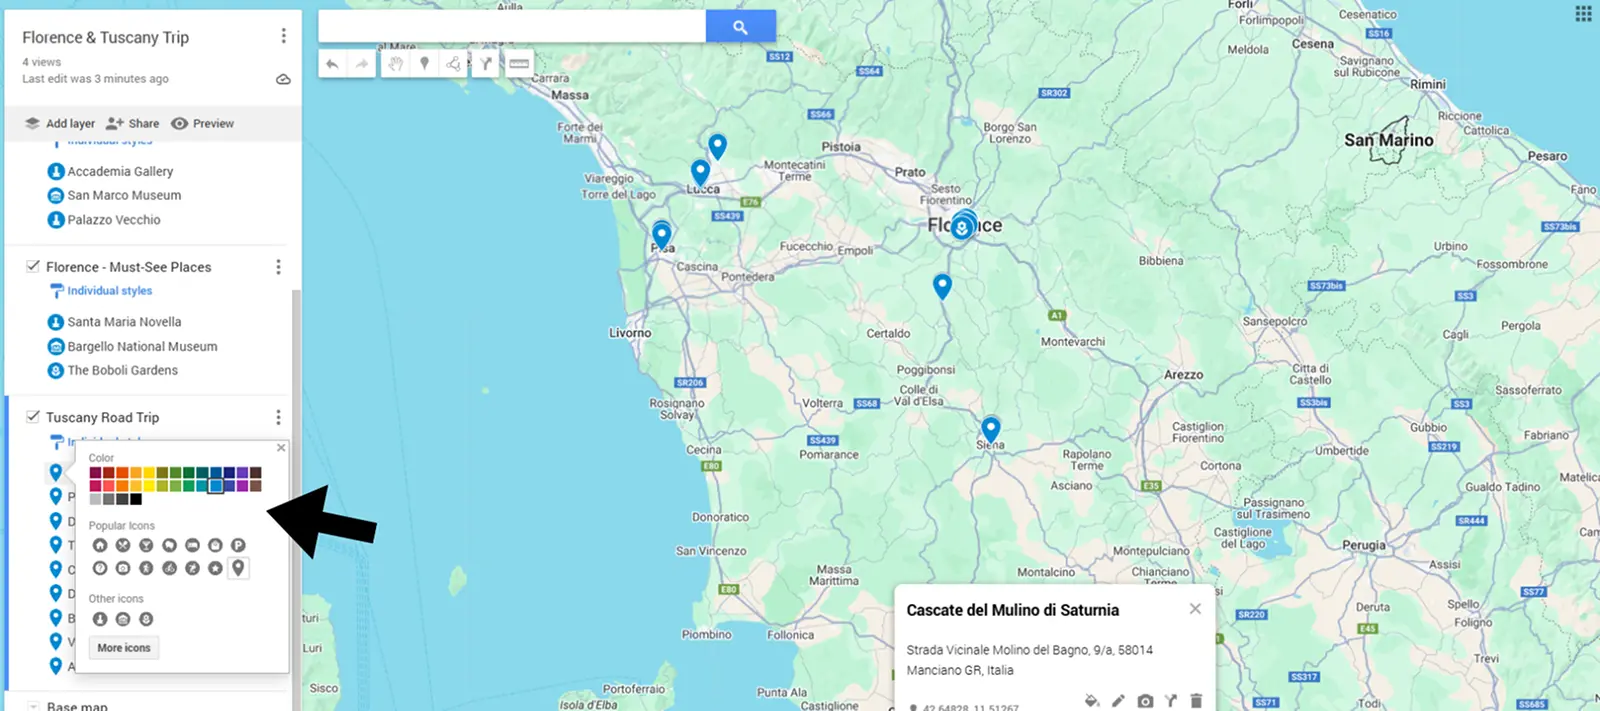
Google gives you lots of options for colors and individual icons. Choose a combination of styles that matches your itinerary. For example, if your list has a mix of restaurants, hotels, and attractions, you can choose a specific icon for each type of activity (e.g., fork for restaurants, bed for hotel, and camera for attractions).
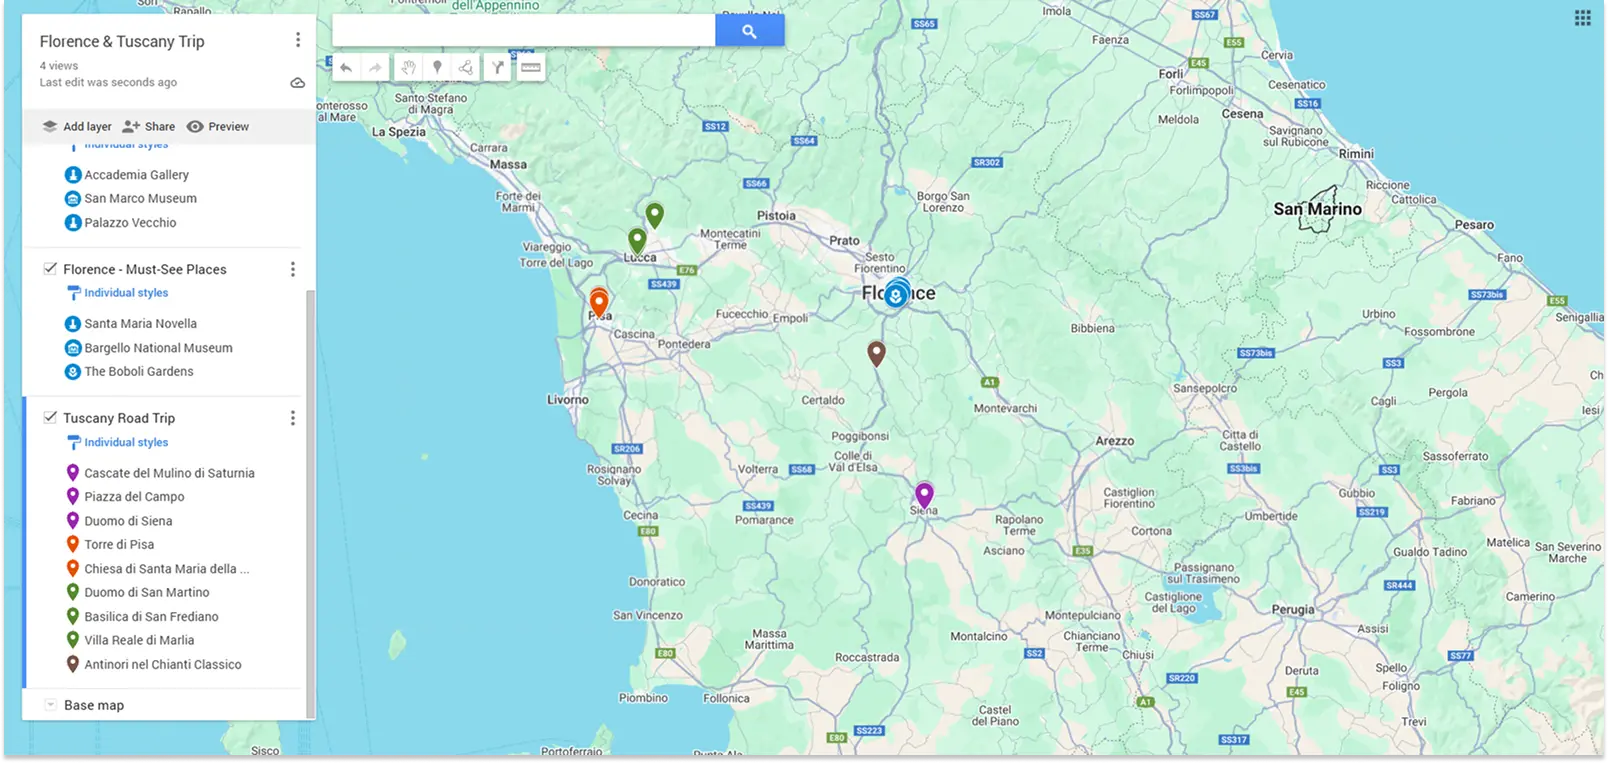
I chose to keep things simple by selecting a specific color for each city or village I’ll be visiting.
Once you’ve customized your pins, you can start using your map — it’s that easy! In just a few steps, you can import a large list of destinations to make your life easier when planning a big trip.
Road trip planning vs. city trip planning
Google Maps can be a great route planner, but you’ll need to take different approaches for planning road trips and city trips.
Road trips are a little more complicated, right? You’re driving from one place to the next, and at each stop, you may have a few places you want to visit. If you’re just visiting a single city, planning is much simpler. Just pick your points, add them to your map, and go.
Tips for road trip planning
- Create a layer for each stop you’re making on your trip
- Add pins to each layer, so you don’t miss any points of interest at each stop
- Include hotels that are on your route, so you can make an impromptu stop if you need
💡 Pro tip: Create a separate layer for "backup stops" — interesting places along your route that you can visit if you're ahead of schedule or need a quick break.
Tips for city trip planning
- If you’re staying multiple days, create a layer for each day, and add pins for each day (just like in my example)
- If you’re only staying one day, create a layer for each type of activity, and choose spots as you go through the day
How to use your Google Maps itinerary/wishlist on the go
You’ve created and shared your map, and you’ve downloaded the Google Maps app. Now what?
Here’s how to use your Map on the go:
- Start by opening up Google Maps and tapping your Map.
- To view all of your pinned locations, tap “View map legend.”
- You won’t be able to tap any of the locations. The only thing you can do is view your itinerary.
- If you want to add directions, navigate back out to the main Map. Tap one of your points of interest, then tap the “Directions” button at the bottom of the map.
- The route planning screen will pop-up. Type in your next location, and Maps will find the best route for you.
By default, you’ll see the driving directions for your next stop. But at the top of the screen, you can change your mode of transport to walking, biking, or public transport.
Maps will change your step-by-step directions automatically based on your mode of transport.
Now, the only thing left to do is enjoy your trip!
Google My Maps vs other trip planning tools
Google My Maps is a powerful tool for creating highly customized maps. But how does it compare to other tools, like Google Lists or routing software?
Google My Maps vs Google Lists
Google Lists makes it easy to save destinations right on Google Maps, and that offers quite a few advantages over Google My Maps:
- You can use it offline. Just download the map area that includes your locations, and your pins will be there automatically — very useful for areas with sketchy cell service.
- You can create and edit lists on your phone. This is something you can’t do with Google My Maps (you can only add, create, or edit pins on desktop). With Lists, all you have to do is find your destination, tap the Save icon, choose where you want to save the destination, and you’re ready to go.
Google Lists is great for saving destinations on the go, but if you prefer visual planning, Google My Maps is still the better option.
When routing software is the better option
If you run a business and need to plan a route with multiple stops, Google My Maps could be a helpful tool. But you’re better off using a dedicated route optimization solution like Routific for this purpose.
Remember — Google My Maps is limited to 2,000 locations and only a handful of layers. It’s not a practical option for planning commercial delivery routes.
When Google My Maps is enough
For some scenarios, Google My Maps is still the best option:
- Future travel
- Vacation planning
If you’re planning a trip with fewer than 2,000 destinations and want to visualize your plans, then Google My Maps is an excellent tool.
Try it for yourself
Want to give the Google Maps trip planner a try for yourself?
We’ve created a starter map with some of the best coffee shops in Vancouver, which is where we’re based — see it here. You’re welcome to copy it, and use it to test out the steps above. Change icon colors, or add your own places.
Here are a few other fun maps to play with:
Once you get the hang of using Google Maps, you can start planning your own trip. Add location pins of your must-see locations, and create a map of your bucket list of cafes, museums, stores, and restaurants to see how easy it is to plan your next trip.
Can you use Google My Maps for business deliveries?
Google My Maps is great for personal trip planning, but what about businesses wanting to plan their delivery routes?
Trip planning is one thing. Even if you’re on a tight schedule, the stakes aren’t as high as a business owner trying to sustain and grow their operations.
Delivery routes are more complicated because there are more factors to consider. If your routes are unoptimized, deliveries may not arrive on time, drivers may get frustrated, and your reputation may suffer as a result.
You need the right tool for the job.
Here’s why Google My Maps isn’t the best option:
- You can’t optimize routes
- There’s no option for driver dispatch
- You can’t take delivery windows into account
Let’s look at an example.
- I need to plan a 15-stop food delivery route.
- I plug all of my addresses into Google My Maps and import them into Google Maps for navigation.
- Google Maps isn’t going to optimize my route. It won’t take into account things like traffic, driver familiarity, delivery windows, or other factors that can impact the time it takes to reach the destination.
In this way, it’s not practical to use Google Maps for delivery.
You need a dedicated route optimization solution, like Routific.
With Routific, you get intelligent optimization that takes into account:
- Traffic patterns
- Driver familiarity and preferences
- Geocoding
But you also get features like:
- Driver dispatch
- Live tracking
- Delivery notifications
It’s a solution built from the ground up with delivery route planning in mind.
That’s something Google Maps can’t offer.
Start your free trial today to take Routific for a test drive.
Frequently Asked Questions
Does Google have a trip planning app?
Yes, there is a Google trip planning app, and you may have heard of it: “Google Trips.” However, the app’s users were redirected to Google Travel when it was shut down in 2019. You can use the Travel web app to plan your trip (click here to try it).
There isn’t a mobile app available on Android or iOS, but you can still use it on the official website.
Google Travel allows you to:
- View popular destinations
- View plane ticket costs and average hotel room costs
- Research top sites, hotels, rentals, flights, and more
Users can save destinations for their trip and add them to their travel plans. For example, I want to visit the Uffizi Gallery, and when I click on it, I see:
- Reviews
- Location
- Pin on the map
If you don’t want to miss one of the places on your bucket list during your next trip, you can add multiple destinations and points of interest right to your travel plan.
Can you see how much time it will take to reach a pinned destination?
You can use Google Maps to get directions for your road trip or for walking. Open up your trip map, and you’ll notice toward the bottom left of the screen, it will say “Directions from” and the name of your location pins.
Next to the directions layer, you’ll want to:
- Tap the three dots
- Click step-by-step directions
You’ll now see directions for each of the days that you have planned, the best route to take, and an easy way to judge if you can fit all of the places on your bucket list into each day.
Can you use the directions layers to navigate?
No, you cannot use the directions layers to navigate around the map. You will have to open the Google Maps app and navigate from there.
What’s the difference between Google My Maps and Google Maps Lists?
Google My Maps is more advanced and customizable than a simple Maps list. If you add places that you want to go on Lists, you’ll only have access to:
- Location name
- Location address
- Reviews of the location
- Operating hours
- Type of location
You can add notes to the places that you add to Lists.
If you add too many places to your list, it can be overwhelming to manage your trip. My Maps allows you to add categories, which makes visualizing your trip more intuitive.
Is there an app for Google My Maps?
You’ll need to use the Google Maps App (Android and iPhone) to access My Maps. You will need a Google account to:
- Create a new Google map
- View your custom map across platforms
You can access My Maps by opening the mobile app, tapping Saved, and continuing using the trip planner. Users can add points of interest to the map, access the directions layer and view their starting point for each day planned.
Can you use custom Google My Maps offline?
You can launch the Google Maps app offline and download maps for the location. However, you cannot access your own map with your points of interest or layers. Offline maps cannot be customized.
Google Maps Route Planner: How To Plan Multi-Stop Routes

5 Waze Route Planner Alternatives for Every Need